Apple's Keynote is already known as a powerful tool for making stunning presentations. Suppose, though, that you want to make animated videos using that same versatility. You want to avoid expensive time-consuming animation software and focus on the quickest steps to an intriguing animated short. If that's the case, Keynote can offer a useful alternative. Keynote animated videos look great and are simple to do.

In this series of articles we're going to show you how to use Keynote to make animated videos. Our exemplar will be our little friend the GDCF Ninja.
Our Ninja has really taken on a life of his own in the videos we've created for him. He gets into all kinds of mischief, and we'll show you how he does it.
Why Make Keynote Animated Videos?
There's a stigma attached to making animated videos that essentially translates to hard work and long hours. That may be the case with some projects, but it doesn't always have to be. Once you get a handle on how animation works in Keynote you'll discover that it's actually really easy to do.
After that you're free to explore the different effects and motions you can incorporate into your videos with abandon. In addition to straight effects, there are limitless combinations that can be done to bring life to any animated project.
To give you an idea of what's possible, check out this video from the YouTube channel of Jakob Jochmann. The entire animation was done in Keynote and exported to iMovie (Jakob mentions that the majority of these same animations can also be done in PowerPoint).
This is just one example of the many possibilities. But don't worry—we won't jump into anything complex in our first tutorial. To begin with, we'll start basic and then explore how to get more complex as time goes on.
Are you ready? Let's dive in and start learning how to make Keynote animated videos!
Keynote Animations: The Basics
On the latest version of Keynote you'll notice that if you open up any new blank presentation you get what's called the Inspector. It's the control panel situated in the top right hand corner of the screen. We have it set for Animate here.

Working With Objects and Images
To begin with you'll need an object on your screen to bring to life. We'll put up our GDCF Ninja. It's as simple as dragging an image onto your frame or adding one from the shapes in Keynote itself.
Clicking on Add an Effect provides you with an extensive drop-down menu of all the quick-pick animations you can try out. These animations all have their own unique effects. Cycle through them and see what they do.

In this case we'll apply a simple animation called Dissolve. This makes the onscreen object appear with a fade-in effect. First, we click on the Ninja to select him. When we do this, we get three choices of when to set the animation:
- Build In: This is for the beginning of the animation, when we first want the object to appear.
- Action: Can be used anytime, but is mainly for the mid-point in our animation circuit (if we have one).
- Build Out: We apply an effect in this case when we want the object to disappear or exit the frame.
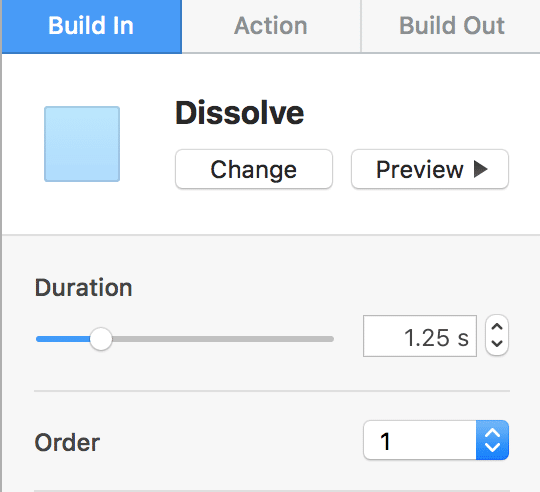
We'll click on Build In, and then choose Dissolve. We can set the timing slider to make the animation as quick or as slow as we want. The default time is set at 1.25 seconds, which usually looks really good. Now, when we click on Preview we can watch our Ninja magically fade in. You'll also notice there is an Order setting. We'll cover this when we talk about multiple object animation later on in the series.
Build Out works the exact same way. Click on it, and choose your effect. In this case, we'll choose something dramatic—a flame effect. Some effects work better for build-outs than others so you'll have to do some experimenting (which is half the fun). Click on the image below to see how they look put together.

The Animation Panel will become extremely important in our journey. You'll know it like the back of your hand when we're done. Try experimenting with different backgrounds and images to see what you can come up with.
So, that's all for today. In our next post we'll look at transitioning between slides and doing simple text animations. Stay tuned!